Shalom's Cottage Home Blog

My photo
Rock Island, IL, United States
Hi, I'm Shalom. Artist, crafter, gardener, flea market enthusiast, bargain hunter, and lover of flavor. Welcome to my journey! shalomschultzdesigns@gmail.com

Visit my Etsy Shop!

Showing posts with label crafts. Show all posts

Friday, December 19, 2014

Welcome to my 2014 Holiday Home Tour!!

I'm a big believer in grabbing joy wherever you can, which is why I tend to be a little nuts about Christmas. Life's not perfect (far from it), but I've found that a little 'sparkle' goes a long way. So, this holiday season, I hope you find lots of reasons to smile and spread a little happiness to others as well. Merry Christmas!  
Welcome to my home! I like to keep things simple on the outside. With just a few pine cones, green bows and a shiny, red wreath I've had forever, I've dressed up my summer gardening pots in holiday style.

Once you step inside, you are right in the middle of my open-plan kitchen/dining/living room. This is the organizational center of my home and it's always pretty wild with color, but I tend to go a bit over the top during the holidays. This area's all about fun! Since nothing needs to match, it's the perfect spot to display greeting cards on a garland decorated with handmade snowflakes.

The shelf over my kitchen cart is a great spot to display smaller figurines that I'd rather keep out of little hands. I love the way they mix with the family photos. Oh, and I found yet another use for those adorable mini pails that Target sells in their $1 section.

Round the corner to my built-in shelf which looks over the dining table. Festive, no? I left it pretty much exactly the same as it looks normally with the simple addition of some snowflakes (strings weighed down by books, etc.), and a few unbreakable ornaments tucked in here and there. So far, my 3-year old's left it alone. Fingers crossed.

But wait! Take a closer look. Can you spot the present I very cleverly 'hid' on this shelf? Hee hee.

What about this one?

This shelf is directly across from my front door and is high enough that I can do a little more 'grown-up' decorating on it. Garlands are homemade from TP rolls, yarn and beads. I got lazy and ordered the orange slices online (instead of taking a whole day to dry them in my oven, as some folks do). I did spent a ridiculous number of hours wrapping the 'JOY' letters in cream yarn and jute, but I really like how they turned out. Additional sparkly/rustic things tucked in here and there. I find it very welcoming to come home and see it first thing each time I walk in the door.

You may have noticed this very little tree in one of the previous photos. Yes, this is how I do Christmas trees in my 700 sq. ft. house and have for years. The convenience of a having a mini tree that fits perfectly on top of my corner fireplace definitely outweighs the hassle of moving furniture to accommodate a larger tree, with the added stress of trying to keep dogs and a small child away from it. But, you'd better believe I still spend hours trying to get it 'just right' each year and packing in as many ornaments as possible (mostly handmade with my vintage blue bulbs adding just the right 'pop' of color to my all-time-favorite 'white-on-white' look). The stack of books under it (on top of which usually sits a potted plant) gives the tree some nice added height to fill the space.'But where are all the PRESENTS', you ask? More on that later.

A couple of presents in matching hues, look just right under my mini tree.

In my son's room, a tiny reindeer watches over him from on top of a shelf (also high up).

A handmade candy cane adorns the window in my son's room. Are you noticing a common theme yet? Soft? Unbreakable? No small parts? When it comes to decorating children's rooms, I definitely follow the rule of 'safety first'. Less stress for me means I can enjoy more of the holidays. 

Aha, presents! I'm no Scrooge. Just because I don't have a lot of space under my tree for gifts, doesn't meant they aren't piled up elsewhere. And I rather like having this festive little stash to look at each time I go into my bedroom. That's all folks. Merry Christmas to you!!


Tuesday, November 25, 2014

Joy to the World!

Unusually early rounds of snow and cold seems to have put everybody in the mood to decorate early for Christmas and I'm no exception. When you're fighting off the winter blues, you need a little extra sparkle in your life. So I spent my weekend making the jute and yarn-wrapped 'JOY' letters with just a touch of silver and gold for added cheer. I have to say, I do find myself smiling every time I walk down my hallway now. 

This is a wreath I did as a donation for a silent auction fundraiser a few weeks ago and is part of a larger front porch display. My theme was 'Winter's Garden' and I was going for a natural, outdoorsy look. I happened to already have the grapevine wreath (leftover from my wedding!) which sparked my idea for the theme. I had some leftover oranges, pine cones and cinnamon sticks, which made their way into my personal holiday decor above.

Saturday, July 5, 2014

Making Mini Display Pillows

 We couldn't have asked for a more beautiful Independence Day yesterday, so I supposed it's only fitting that today is cool and cloudy with more thunderstorms onthe horizon. Still, it's a nice opportunity to just relax indoors after all the excitement. A good day for a long bath (for the little one) while I work on my next sewing project. I made these 'LOVE' pillows back in February for my Valentines display and I want to make more like them for my Etsy shop. I also like the words 'HOME' and 'NEST'. Any other suggestions for words you'd like to see on display in your home?

Me getting some work done while my son takes his bath (sometimes it's the only way - haha!). I'm fraying the edges of the 'O' by pulling the outer threads loose with a straight pin and then trimming the ends.

Tuesday, July 1, 2014

10 Easy 4th of July DIY Decorating Projects

Here are 10 of my favorite Easy 4th of July Decorating Projects. Whether you're 'crafty' or not, there's something here that everyone can do with just a little time (or hardly any). Happy Independence Day week everyone!!  
 1) With a little paint and a little tape, and possibly a stencil for the stars, you can turn every-day mason jars into wow-worthy and reusable vases for your 4th of July party.

2) Simpy tie American Flag-printed bandanas together for instant festive bunting!

 3) Making these lawn stars involves just cardboard or posterboard and some flour. A great project to get the kids involved!

 4) Just write your favorite patriotic saying on a chalkboard and surround it with a few pieces of red-white-and-blue decor.

5) Use colored sand to create festive 4th of July votives. A great project for older kids.

 6) Even if you don't have a big American Flag to hang up, you can still get in the Independence Day spirit by adding some red-white-and-blue throw pillows into your exisiting decor.

 7) I love this ridiculously simple decorating idea! Works for inside OR outside. I think the mini flags are only about $1 each.

8)  Cut triangles out of red-white-and-blue fabric or bandanas. Fold the top edges over and secure with safety pins or sew. Run a length of yarn through them and you've got a super-cute banner!

9) Sew some red-white-and-blue bandanas together for a festive tablecloth.

10) This ribbon wand could be a safe alternative to sparklers or just a way for the kids to have fun and show their patriotic spirit while waiting for it to get dark outside.

Friday, April 4, 2014

INSTANT Modern Art...your kids can do!

I'd like to highlight a new artist I've just discovered...my son!! Connor is 2 1/2 and LOVES to create with anything I put in front of him. Earlier this week he did watercolors and paper mosaics for the first time and suddenly I knew what to do with that barren spot on the wall in my kitchen. I hung up a bulletin board and then tacked up his artwork so it overlapped the board by 2-3" on all sides (thicker paper like card stock works best as it won't curl on the edges). The result is one big, colorful, abstract art piece and it looks AWESOME if I do say so myself. I know I'm a bit biased, but it's just such a cheerful pop of color now where there once was nothing but a phone jack we don't use anymore. Just around the corner is a dark hallway that could also use some sprucing up...can't wait to see what my baby comes up with next! 

Wednesday, February 26, 2014

Easy DIY Tote Bags for Summer

Lately I can't stop thinking about the Farmers Market that will be open in just a few short months (and all the snow will be gone!). But a great way to pass the time and get ready for warmer weather is to make some cute new DIY Tote Bags to take outside with you. Here are 4 easy tutorials to try. Have fun!
Pillow Case Tote,http://www.countryliving.com/crafts/projects/how-to-sew-a-pillowcase-tote

Geometric Painted Canvas Tote,http://www.collectandcarry.com/2012/04/diy-geometric-painted-tote-bags.html
No-Sew T-Shirt Tote, http://www.socreativethings.com/10-minute-cloth-bag-no-sew-needed/
New-Sew T-Shirt Produce Bag,http://www.onegoodthingbyjillee.com/2012/06/super-easy-summertime-tote-bag.html

Monday, February 24, 2014

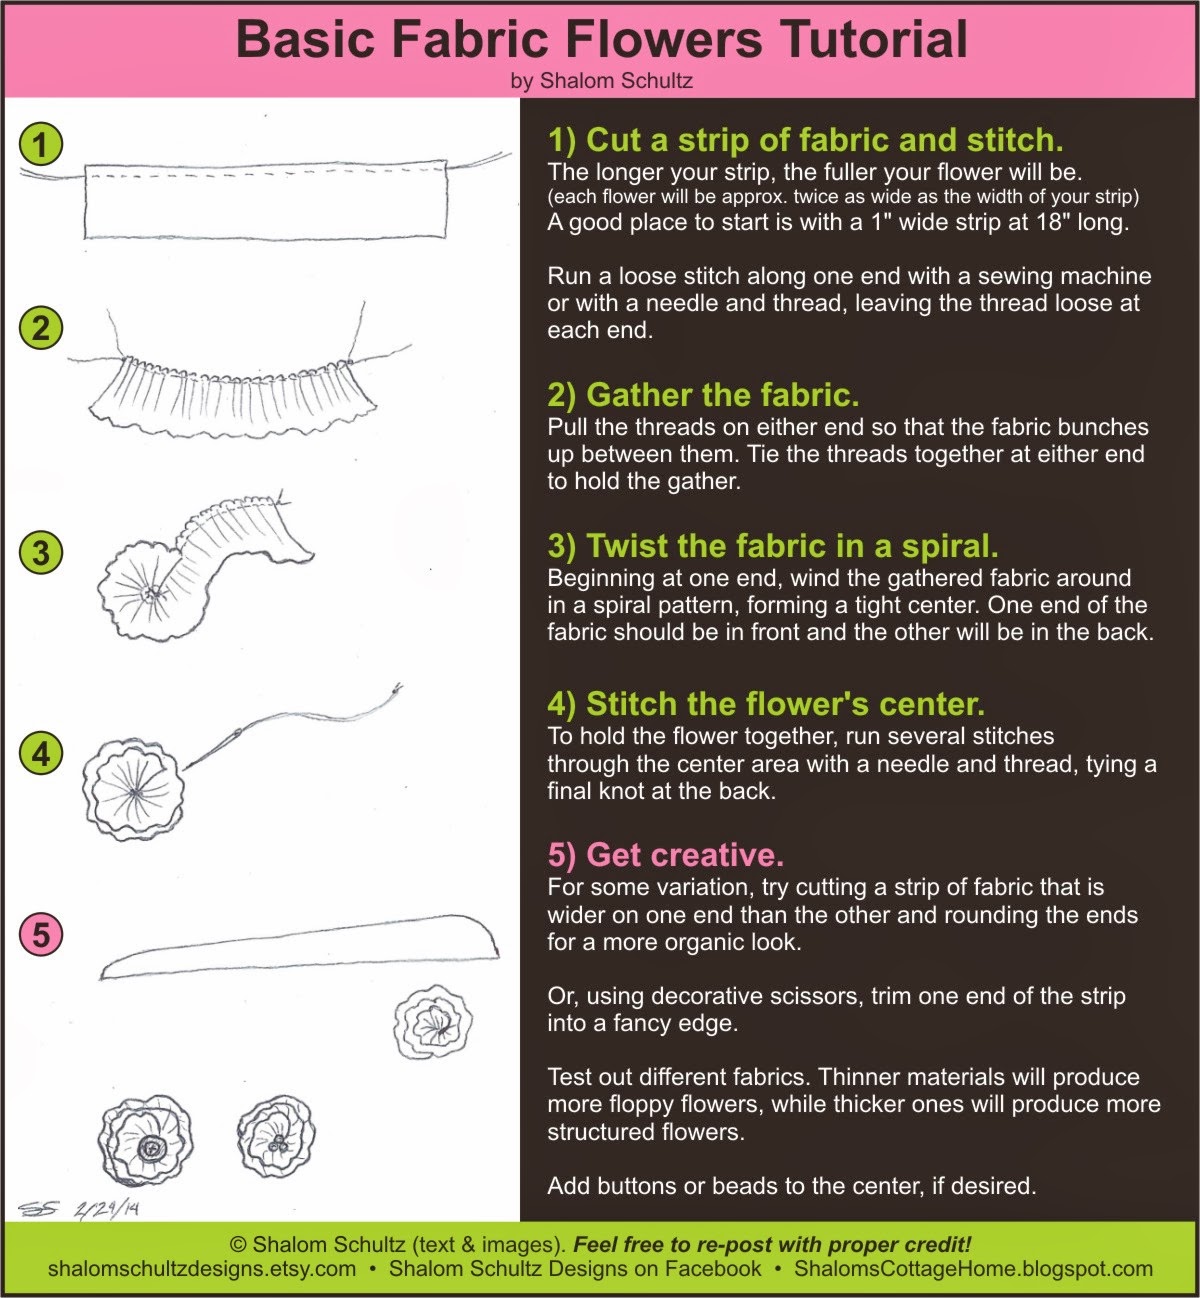
Easy DIY Fabric Flowers Tutorial

It's that time of year again, when, impatient for Spring to arrive, I just can't wait any longer to have flowers in my house. So the only thing to do is to make some myself! Here's a quick & easy tutorial that will allow you to make masses of flowers that will last forever. All you need is fabric, scissors, needle & thread. Cost is $0 to just a few bucks for basic supplies, depending on what you already have in your house. Have fun and have faith that Spring is right around the corner!!!

Fabric Flowers by Shalom Schultz Designs


I used t-shirt material for the larger, floppy flowers and a printed cotton fabric for the smaller, stiffer flowers. Then I added a variety of buttons to the center for the finishing touch.

Once all the flowers were done, I hot glued them to a wreath form I had previously wrapped in burlap ribbon (also secured with hot glue).

Fabric Flowers Tutorial by Shalom Schultz Designs
Feel free to re-post with proper credit!


Saturday, September 1, 2012

Easy Decoupage Pumpkins

Photo © Shalom Schultz


I've always wanted to try this, but all the instructions I'd come across previously seemed far too complicated, so I came up with my own!

First, I bought a mini artificial pumpkin for $3 at the craft store (about 5 inches in diameter). Then, I measured the distance from the base of the stalk at the top to the center of the bottom and cut 1.5" wide strips of some fabric I had on hand in this length (for this size pumpkin I used about 12). Next, I rounded the tops and bottoms of the strips into 'petal' shapes with blunt ends so they'd conform more naturally to the shape of the pumpkin.

Using Alleene's Instant Decoupage (regular glue would probably work too) and a foam brush, I coated the back side of each strip of fabric, then positioned it on my pumpkin, using my fingers to smooth out the edges. Each strip slightly overlapped the one before.

I made sure that the tops of the fabric 'petals' aligned neatly around the base of the stalk, which meant that they didn't align so neatly at the bottom, but when I was finished covering my pumpkin, I just cut a circle of fabric and glued it over the center of the bottom for a nice, clean look.

The whole process only took me about an hour. Now I want to create a whole 'patch' with different size pumpkins and fabrics that I can use again next year!